Blogger Tips
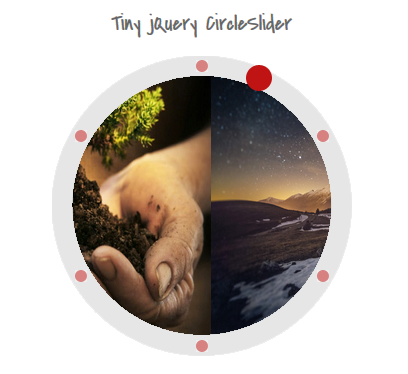
Tiny Circleslider is a small jQuery plugin generating a circular carousel of images that we can slide infinitely (circular). When clicking on the red dot, the main picture moves to the left and another set of images will slide out. There is nothing complicated about using this type of carousel, however when it's about customizing it, we need to use a bit of arithmetic. All these details can be found in the author's homepage, so I'll just limit myself to show you the basics.
To see it in action, please visit the below demo blog and just drag the red dot:
Step 1. Log in to your Blogger account > select your blog
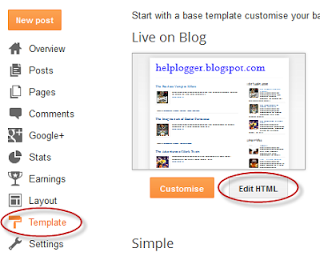
Step 2. Go to "Template" and hit the Edit HTML button:
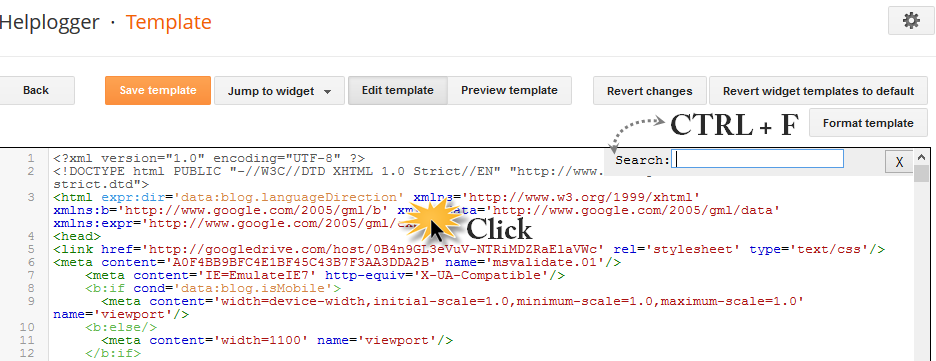
Step 3. Click anywhere on the code area and search by using the CTRL + F keys for this tag:
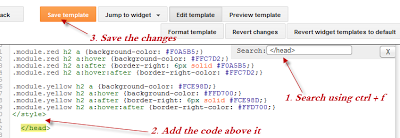
Step 4. Just above the </head> tag, add the following scripts:
Step 5. Now, let's add the CSS styles above the same </head> tag:
Step 6. Save the changes by clicking the Save Template button
And here's the HTML that has to be added to where we want to display the carousel. To add it inside a post, click the "New post" button on the left side of your dashboard and paste the below code in the "HTML" box of your post:
Replace the imageURL text with the URL of your images.
Some other options that could be added, separated by commas:
1) snaptodots: false if you want no dots to be shown when dragging them
2) hidedots: false if you want to display the internal points (by default is true)
3) intervaltime - is the time between slides (by default 3500)
4) radius - defines the size of the circle (by default is 140)
To add it to your sidebar, simply go to "Layout" > click the "Add a Gadget link" > from the popup window, choose "HTML/Javascript" and paste the code inside the empty box.
- Display Blogger Posts In Grid View With Thumbnails
Grid View with Thumbnails is a script for self-hosted Blogger blogs which will display blog posts as a thumbnail grid of images in homepage and archive pages. Instead of sending your blog visitors to a page that displays all the posts in full length with...
- Advanced Random Posts Widget For Blogger With Image Thumbnails And Snippets
When your blog has too many posts, visitors don't always have the time or desire to go through all the posts written there in order to make an idea of the blog's content. Thus, a random posts widget that will allow visitors to find content more...
- Create A Background Slideshow For Blogger
In the previous post we saw how to make the blog's background fill the screen regardless of the resolution of the monitor. The method that we'll use now with jQuery is a plugin called BackStretch which also has the option of creating a slideshow...
- Add Static Facebook Pop Out Like Box With Smooth Jquery Hover Effect
In this tutorial, I will show you how to add a cool floating Facebook like widget for Blogger that slides to the left on mouseover. Demo: You can see a static Facebook badge on the right side of this blog: Demo blog Adding Static Facebook Like widget...
- Add Random Posts Widget To Blogger
The Random Posts widget or gadget for Blogger will display random posts added to your blog that, due to the natural structure of blogs, could get lost easily deep in your archives. Most of the time, when new people join your site, they rarely bother going...
Blogger Tips
How to Add a Tiny jQuery Circleslider to Blogger
Tiny Circleslider is a small jQuery plugin generating a circular carousel of images that we can slide infinitely (circular). When clicking on the red dot, the main picture moves to the left and another set of images will slide out. There is nothing complicated about using this type of carousel, however when it's about customizing it, we need to use a bit of arithmetic. All these details can be found in the author's homepage, so I'll just limit myself to show you the basics.
To see it in action, please visit the below demo blog and just drag the red dot:
Tiny jQuery Circleslider Demo

Adding the Tiny CircleSlider to a Blogger Blog
In order to make it work, first task is to add the javascript jQuery library in the template:Step 1. Log in to your Blogger account > select your blog
Step 2. Go to "Template" and hit the Edit HTML button:

Step 3. Click anywhere on the code area and search by using the CTRL + F keys for this tag:
</head>

Step 4. Just above the </head> tag, add the following scripts:
<script src='http://ajax.googleapis.com/ajax/libs/jquery/1.10.2/jquery.min.js' type='text/javascript'/>
<script>
//<![CDATA[
/*! Tiny Circleslider - v2.0.8 - 2015-08-08
* http://www.baijs.com/tinycircleslider
*
* Copyright (c) 2015 Maarten Baijs <[email protected]>;
* Licensed under the MIT license */
!function(a){"function"==typeof define&&define.amd?define(["jquery"],a):"object"==typeof exports?module.exports=a(require("jquery")):a(jQuery)}(function(a){function b(b,e){function f(){return k(),w.append(x.first().clone()).css("width",B.width*(x.length+1)),g(),r(0),v.move(v.options.start,v.options.interval),v}function g(){G&&(b[0].ontouchstart=u,b[0].ontouchmove=q,b[0].ontouchend=s),y.bind("mousedown",u);var c=function(b){return b.preventDefault(),b.stopImmediatePropagation(),v.stop(),v.move(a(this).attr("data-slide-index")),!1};G&&b.delegate(".dot","touchstart",c),b.delegate(".dot","mousedown",c)}function h(a){E=setTimeout(function(){v.move(v.slideCurrent+1,!0)},a?50:v.options.intervalTime)}function i(a){return a*(Math.PI/180)}function j(a){return 180*a/Math.PI}function k(){var c=document.createDocumentFragment();z.remove(),x.each(function(b,d){var e=null,f=parseInt(a(d).attr("data-degrees"),10)||360*b/v.slidesTotal,g={top:-Math.cos(i(f))*v.options.radius+A.height/2-D.height/2,left:Math.sin(i(f))*v.options.radius+A.width/2-D.width/2};z.length>0&&(e=z.clone(),e.addClass(a(d).attr("data-classname")).css(g),c.appendChild(e[0])),v.dots.push({angle:f,slide:d,dot:e})}),v.dots.sort(function(a,b){return a.angle-b.angle}),a.each(v.dots,function(b,c){a(c.dot).length>0&&a(c.dot).addClass("dot-"+(b+1)).attr("data-slide-index",b).html("<span>"+(b+1)+"</span>")}),b.append(c),z=b.find(".dot")}function l(a,b){var c,d,e;return a>b?(c=a-b,d=-(b+360-a)):(c=a+360-b,d=-(b-a)),e=c<Math.abs(d)?c:d,[e,d,c]}function m(b){var c=9999,d=9999,e=9999,f=0,g=0,h=0;return a.each(v.dots,function(a,i){var j=l(i.angle,b);Math.abs(j[0])<Math.abs(e)&&(e=j[0],h=a),Math.abs(j[1])<Math.abs(c)&&(c=j[1],f=a),Math.abs(j[2])<Math.abs(d)&&(d=j[2],g=a)}),[[h,f,g],[e,c,d]]}function n(a){return 0>a?360+a%-360:a%360}function o(a,b,c){var d=a,e=!1;Math.abs(a)>Math.abs(b)?(d=-b,e=!0):I?requestAnimationFrame(function(){o(d,b+a)}):F=setTimeout(function(){o(d,b+a,.9*c)},c),v.angleCurrent=n(v.angleCurrent-d),r(v.angleCurrent,e)}function p(a){return{x:H?a.targetTouches[0].pageX:a.pageX||a.clientX,y:H?a.targetTouches[0].pageY:a.pageY||a.clientY}}function q(a){var c=b.offset(),d={left:p(a).x-c.left-A.width/2,top:p(a).y-c.top-A.height/2};return v.angleCurrent=n(j(Math.atan2(d.left,-d.top))),I||r(v.angleCurrent),!1}function r(a,c){closestSlidesAndAngles=m(a),closestSlides=closestSlidesAndAngles[0],closestAngles=closestSlidesAndAngles[1],w.css("left",-(closestSlides[1]*B.width+Math.abs(closestAngles[1])*B.width/(Math.abs(closestAngles[1])+Math.abs(closestAngles[2])))),y.css({top:-Math.cos(i(a))*v.options.radius+(A.height/2-C.height/2),left:Math.sin(i(a))*v.options.radius+(A.width/2-C.width/2)}),c&&b.trigger("move",[x[v.slideCurrent],v.slideCurrent])}function s(b){return a(b.target).hasClass("dot")?!1:(v.dragging=!1,b.preventDefault(),a(document).unbind("mousemove mouseup"),y.unbind("mouseup"),v.options.dotsHide&&z.stop(!0,!0).fadeOut("slow"),v.options.dotsSnap&&v.move(m(v.angleCurrent)[0][0]),void 0)}function t(){v.dragging&&(r(v.angleCurrent),requestAnimationFrame(function(){t()}))}function u(b){return b.preventDefault(),H="touchstart"==b.type,v.dragging=!0,a(b.target).hasClass("dot")?!1:(v.stop(),a(document).mousemove(q),a(document).mouseup(s),y.mouseup(s),v.options.dotsHide&&z.stop(!0,!0).fadeIn("slow"),I&&t(),void 0)}this.options=a.extend({},d,e),this._defaults=d,this._name=c;var v=this,w=(b.find(".viewport"),b.find(".overview")),x=w.children(),y=b.find(".thumb"),z=b.find(".dot"),A=(x.find("a"),{width:b.outerWidth(!0),height:b.outerHeight(!0)}),B={width:x.first().outerWidth(!0),height:x.first().outerHeight(!0)},C={width:y.outerWidth(!0),height:y.outerHeight(!0)},D={width:z.outerWidth(),height:z.outerHeight()},E=null,F=null,G="ontouchstart"in window,H=!1,I="requestAnimationFrame"in window;return this.dots=[],this.slideCurrent=0,this.angleCurrent=0,this.slidesTotal=x.length,this.intervalActive=!1,this.start=function(a){return v.options.interval&&(v.intervalActive=!0,h(a)),v},this.stop=function(){return v.intervalActive=!1,clearTimeout(E),v},this.move=function(a){var b=Math.max(0,isNaN(a)?v.slideCurrent:a);b>=v.slidesTotal&&(b=0);var c=v.dots[b]&&v.dots[b].angle,d=l(c,v.angleCurrent)[0],e=d>0?-2:2;return v.slideCurrent=b,o(e,d,50),v.start(),v},f()}var c="tinycircleslider",d={interval:!1,intervalTime:3500,dotsSnap:!1,dotsHide:!0,radius:140,start:0};a.fn[c]=function(d){return this.each(function(){a.data(this,"plugin_"+c)||a.data(this,"plugin_"+c,new b(a(this),d))})}});
//]]>
</script>
Please note that if you already have another version of jQuery, you will need to remove the line in red.<script>
//<![CDATA[
/*! Tiny Circleslider - v2.0.8 - 2015-08-08
* http://www.baijs.com/tinycircleslider
*
* Copyright (c) 2015 Maarten Baijs <[email protected]>;
* Licensed under the MIT license */
!function(a){"function"==typeof define&&define.amd?define(["jquery"],a):"object"==typeof exports?module.exports=a(require("jquery")):a(jQuery)}(function(a){function b(b,e){function f(){return k(),w.append(x.first().clone()).css("width",B.width*(x.length+1)),g(),r(0),v.move(v.options.start,v.options.interval),v}function g(){G&&(b[0].ontouchstart=u,b[0].ontouchmove=q,b[0].ontouchend=s),y.bind("mousedown",u);var c=function(b){return b.preventDefault(),b.stopImmediatePropagation(),v.stop(),v.move(a(this).attr("data-slide-index")),!1};G&&b.delegate(".dot","touchstart",c),b.delegate(".dot","mousedown",c)}function h(a){E=setTimeout(function(){v.move(v.slideCurrent+1,!0)},a?50:v.options.intervalTime)}function i(a){return a*(Math.PI/180)}function j(a){return 180*a/Math.PI}function k(){var c=document.createDocumentFragment();z.remove(),x.each(function(b,d){var e=null,f=parseInt(a(d).attr("data-degrees"),10)||360*b/v.slidesTotal,g={top:-Math.cos(i(f))*v.options.radius+A.height/2-D.height/2,left:Math.sin(i(f))*v.options.radius+A.width/2-D.width/2};z.length>0&&(e=z.clone(),e.addClass(a(d).attr("data-classname")).css(g),c.appendChild(e[0])),v.dots.push({angle:f,slide:d,dot:e})}),v.dots.sort(function(a,b){return a.angle-b.angle}),a.each(v.dots,function(b,c){a(c.dot).length>0&&a(c.dot).addClass("dot-"+(b+1)).attr("data-slide-index",b).html("<span>"+(b+1)+"</span>")}),b.append(c),z=b.find(".dot")}function l(a,b){var c,d,e;return a>b?(c=a-b,d=-(b+360-a)):(c=a+360-b,d=-(b-a)),e=c<Math.abs(d)?c:d,[e,d,c]}function m(b){var c=9999,d=9999,e=9999,f=0,g=0,h=0;return a.each(v.dots,function(a,i){var j=l(i.angle,b);Math.abs(j[0])<Math.abs(e)&&(e=j[0],h=a),Math.abs(j[1])<Math.abs(c)&&(c=j[1],f=a),Math.abs(j[2])<Math.abs(d)&&(d=j[2],g=a)}),[[h,f,g],[e,c,d]]}function n(a){return 0>a?360+a%-360:a%360}function o(a,b,c){var d=a,e=!1;Math.abs(a)>Math.abs(b)?(d=-b,e=!0):I?requestAnimationFrame(function(){o(d,b+a)}):F=setTimeout(function(){o(d,b+a,.9*c)},c),v.angleCurrent=n(v.angleCurrent-d),r(v.angleCurrent,e)}function p(a){return{x:H?a.targetTouches[0].pageX:a.pageX||a.clientX,y:H?a.targetTouches[0].pageY:a.pageY||a.clientY}}function q(a){var c=b.offset(),d={left:p(a).x-c.left-A.width/2,top:p(a).y-c.top-A.height/2};return v.angleCurrent=n(j(Math.atan2(d.left,-d.top))),I||r(v.angleCurrent),!1}function r(a,c){closestSlidesAndAngles=m(a),closestSlides=closestSlidesAndAngles[0],closestAngles=closestSlidesAndAngles[1],w.css("left",-(closestSlides[1]*B.width+Math.abs(closestAngles[1])*B.width/(Math.abs(closestAngles[1])+Math.abs(closestAngles[2])))),y.css({top:-Math.cos(i(a))*v.options.radius+(A.height/2-C.height/2),left:Math.sin(i(a))*v.options.radius+(A.width/2-C.width/2)}),c&&b.trigger("move",[x[v.slideCurrent],v.slideCurrent])}function s(b){return a(b.target).hasClass("dot")?!1:(v.dragging=!1,b.preventDefault(),a(document).unbind("mousemove mouseup"),y.unbind("mouseup"),v.options.dotsHide&&z.stop(!0,!0).fadeOut("slow"),v.options.dotsSnap&&v.move(m(v.angleCurrent)[0][0]),void 0)}function t(){v.dragging&&(r(v.angleCurrent),requestAnimationFrame(function(){t()}))}function u(b){return b.preventDefault(),H="touchstart"==b.type,v.dragging=!0,a(b.target).hasClass("dot")?!1:(v.stop(),a(document).mousemove(q),a(document).mouseup(s),y.mouseup(s),v.options.dotsHide&&z.stop(!0,!0).fadeIn("slow"),I&&t(),void 0)}this.options=a.extend({},d,e),this._defaults=d,this._name=c;var v=this,w=(b.find(".viewport"),b.find(".overview")),x=w.children(),y=b.find(".thumb"),z=b.find(".dot"),A=(x.find("a"),{width:b.outerWidth(!0),height:b.outerHeight(!0)}),B={width:x.first().outerWidth(!0),height:x.first().outerHeight(!0)},C={width:y.outerWidth(!0),height:y.outerHeight(!0)},D={width:z.outerWidth(),height:z.outerHeight()},E=null,F=null,G="ontouchstart"in window,H=!1,I="requestAnimationFrame"in window;return this.dots=[],this.slideCurrent=0,this.angleCurrent=0,this.slidesTotal=x.length,this.intervalActive=!1,this.start=function(a){return v.options.interval&&(v.intervalActive=!0,h(a)),v},this.stop=function(){return v.intervalActive=!1,clearTimeout(E),v},this.move=function(a){var b=Math.max(0,isNaN(a)?v.slideCurrent:a);b>=v.slidesTotal&&(b=0);var c=v.dots[b]&&v.dots[b].angle,d=l(c,v.angleCurrent)[0],e=d>0?-2:2;return v.slideCurrent=b,o(e,d,50),v.start(),v},f()}var c="tinycircleslider",d={interval:!1,intervalTime:3500,dotsSnap:!1,dotsHide:!0,radius:140,start:0};a.fn[c]=function(d){return this.each(function(){a.data(this,"plugin_"+c)||a.data(this,"plugin_"+c,new b(a(this),d))})}});
//]]>
</script>
Step 5. Now, let's add the CSS styles above the same </head> tag:
<style>
#rotatescroll { /* is the rectangle container */
height: 300px;
position: relative;
width: 300px;
}
#rotatescroll .viewport { /* is the rectangle containing the images */
height: 300px;
position: relative;
margin: 0 auto;
overflow: hidden;
width: 300px
}
#rotatescroll .overview { /* is the list with the images */
left: 0;
list-style: none;
margin: 0;
padding: 0;
position: absolute;
top: 0;
}
#rotatescroll .overview li { /* each item of the list */
float: left;
height: 300px;
position: relative;
width: 300px;
}
#rotatescroll .overlay { /* the image with the circle overlapping the list */
background: transparent url(http://4.bp.blogspot.com/-Ot8KEdqWA58/Um59McoG1bI/AAAAAAAAEgY/ZzK7Qidizrg/s1600/bg-rotatescroll.png) no-repeat 0 0;
height: 300px;
left: 0;
position: absolute;
top: 0;
width:300px;
}
#rotatescroll .thumb { /* the red circle that allows us to navigate */
background:transparent url(http://1.bp.blogspot.com/-SY8PG9E-_ZQ/Um59McKv1vI/AAAAAAAAEgc/tEDJm6soGfE/s1600/bg-thumb.png) no-repeat 0 0;
cursor: pointer;
height: 26px;
left: 137px;
position: absolute;
top: -3px;
width: 26px;
z-index: 200;
}
#rotatescroll .dot { /* the points indicating the position of each image */
background: transparent url(http://3.bp.blogspot.com/-O0kN8rvZGSE/Um59MRdOpHI/AAAAAAAAEgQ/XCiipR_fCKM/s1600/bg-dot.png) no-repeat 0 0;
display: none;
height: 12px;
left: 155px;
position: absolute;
top: 3px;
width: 12px;
z-index: 100;
}
#rotatescroll .dot span { /* are hidden by default */
display: none;
}
#rotatescroll .viewport ul.overview li img {
width: 300px;
min-height: 300px;
object-fit: cover;
padding:0;
border:0;
}
</style>
 |
| Screenshot |
And here's the HTML that has to be added to where we want to display the carousel. To add it inside a post, click the "New post" button on the left side of your dashboard and paste the below code in the "HTML" box of your post:
<div id="rotatescroll">
<div class="viewport">
<ul class="overview">
<li><img src="imageURL" /></li>
<li><img src="imageURL" /></li>
<li><img src="imageURL" /></li>
<li><img src="imageURL" /></li>
<li><img src="imageURL" /></li>
</ul>
</div>
<div class="dot"></div>
<div class="overlay"></div>
<div class="thumb"></div>
</div>
<script type="text/javascript">
$(document).ready(function(){
$('#rotatescroll').tinycircleslider({
interval: true,
snaptodots: true
});
});
</script>
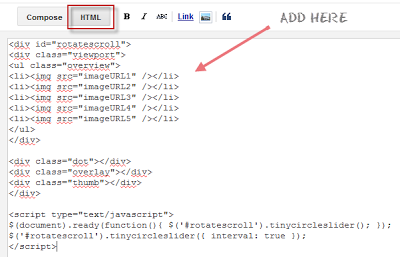 |
| Adding HTML inside a Blogger post |
Replace the imageURL text with the URL of your images.
Some other options that could be added, separated by commas:
1) snaptodots: false if you want no dots to be shown when dragging them
2) hidedots: false if you want to display the internal points (by default is true)
3) intervaltime - is the time between slides (by default 3500)
4) radius - defines the size of the circle (by default is 140)
To add it to your sidebar, simply go to "Layout" > click the "Add a Gadget link" > from the popup window, choose "HTML/Javascript" and paste the code inside the empty box.
- Display Blogger Posts In Grid View With Thumbnails
Grid View with Thumbnails is a script for self-hosted Blogger blogs which will display blog posts as a thumbnail grid of images in homepage and archive pages. Instead of sending your blog visitors to a page that displays all the posts in full length with...
- Advanced Random Posts Widget For Blogger With Image Thumbnails And Snippets
When your blog has too many posts, visitors don't always have the time or desire to go through all the posts written there in order to make an idea of the blog's content. Thus, a random posts widget that will allow visitors to find content more...
- Create A Background Slideshow For Blogger
In the previous post we saw how to make the blog's background fill the screen regardless of the resolution of the monitor. The method that we'll use now with jQuery is a plugin called BackStretch which also has the option of creating a slideshow...
- Add Static Facebook Pop Out Like Box With Smooth Jquery Hover Effect
In this tutorial, I will show you how to add a cool floating Facebook like widget for Blogger that slides to the left on mouseover. Demo: You can see a static Facebook badge on the right side of this blog: Demo blog Adding Static Facebook Like widget...
- Add Random Posts Widget To Blogger
The Random Posts widget or gadget for Blogger will display random posts added to your blog that, due to the natural structure of blogs, could get lost easily deep in your archives. Most of the time, when new people join your site, they rarely bother going...
