Blogger Tips
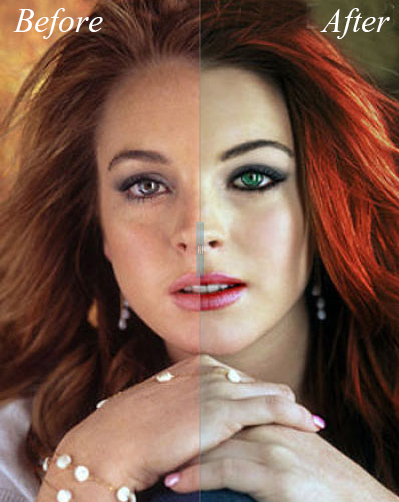
If you have a design or makeup blog, or if you are using before and after image comparison, this script will surely be very useful for you. In this tutorial, you will see how to add the Before/After plugin, a script that works with jQuery to display two pictures dynamically for comparing them at the same time.
To see it in action, please click on the demo link from below - by dragging sideways the small bar, you'll see both images that are being compared:

Implementing this script is really easy. We just need jQuery, the Before/After script, and the two images to compare.

Step 2. Right before </head> paste the following scripts:
Note: if the above script doesn't work for you, add it above the </body> tag. Also, please see if you have added jQuery in your template (if you did so, then remove the line in green)
Step 3. To add it as a gadget - go to "Layout" > click on the "Add a gadget" link > choose "HTML/Javascript" option in the pop-up window and paste this code inside the empty box:
If you want to add more images, you will need to change the ID of the container. In my example, the container is called beforeafter1, so you will need to change it to beforeafter2 and so on, although, you can choose any name as long as all are different.
Then, add another line, like the blue one from below, in the first code that you added in step 2:
Below each image /photo container are the "Show only Before" and "Show only after" links that, once you click on them, will display the "before" or "after" picture. If you want to hide these links, then just change "true" to "false" in the first code (step 2) and they will not be displayed anymore.
Note: if you see white space around the drag icons, then search for this code in your template:
Autor: Catch my fame
- Orbit - Jquery Image Slider Plugin For Blogger
In this tutorial, you will see how to add another beautiful image slider for Blogger / BlogSpot made with jQuery and, of course, with HTML and CSS. This slider, called Orbit, is a lightweight jQuery plugin that will display multiple images in a limited...
- Spacegallery: Image Gallery/slideshow Made With Jquery
There are many types of galleries for images that can be found on the internet, but we rarely find one displaying images so differently like this one. Those using Mac OS X will surely notice a lot of similarity with Time Machine and those who don't,...
- How To Add Go To Top And Go To Bottom Buttons Using Jquery In Blogger
The Up and Down buttons can be used to navigate to the top and bottom of the page content, especially when on the main page are many articles or when an article has too many comments. These buttons have a fadeIn and fadeOut effect, this means that they...
- Add Static Facebook Pop Out Like Box With Smooth Jquery Hover Effect
In this tutorial, I will show you how to add a cool floating Facebook like widget for Blogger that slides to the left on mouseover. Demo: You can see a static Facebook badge on the right side of this blog: Demo blog Adding Static Facebook Like widget...
- Add Css/jquery Fixed Horizontal Menu To Blogger Blog
This navigation bar gets semi-transparent when you scroll down the page and is slightly showing up by fading out and becoming almost transparent. When the user hovers over it, the menu becomes opaque again. Inside of the navigation there are some links,...
Blogger Tips
Before/After Photo Effect with jQuery
If you have a design or makeup blog, or if you are using before and after image comparison, this script will surely be very useful for you. In this tutorial, you will see how to add the Before/After plugin, a script that works with jQuery to display two pictures dynamically for comparing them at the same time.
To see it in action, please click on the demo link from below - by dragging sideways the small bar, you'll see both images that are being compared:
Before & After Demo

Implementing this script is really easy. We just need jQuery, the Before/After script, and the two images to compare.
How to add Before/After Effect on Blogger Images
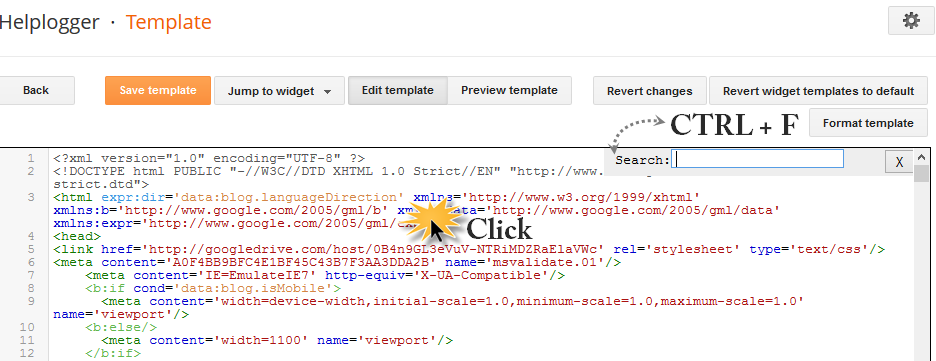
Step 1. Go to Template > Edit HTML and click anywhere inside the code area. Now press the CTRL + F keys and search for the following tag - hit Enter to find it:</head>

Step 2. Right before </head> paste the following scripts:
<script src='http://ajax.googleapis.com/ajax/libs/jquery/1.10.2/jquery.min.js' type='text/javascript'/>Step 3. Click the Save template button to save your changes.
<script src='http://code.jquery.com/ui/1.10.3/jquery-ui.js' type='text/javascript'/>
<script type='text/javascript'>
//<![CDATA[
(function(a){a.fn.extend({beforeAfter:function(b){var d={animateIntro:false,introDelay:1000,introDuration:1000,showFullLinks:true,imagePath:"/js/beforeAfter/"};var b=a.extend(d,b);var c=Math.round(Math.random()*100000000);return this.each(function(){var e=b;var h=a(this);var n=a("img:first",h).width();var p=a("img:first",h).height();a(h).width(n).height(p).css({overflow:"hidden",position:"relative",padding:"0"});var m=a("img:first",h).attr("src");var j=a("img:last",h).attr("src");a("img:first",h).attr("id","beforeimage"+c);a("img:last",h).attr("id","afterimage"+c);a("img",h).remove();a("div",h).css("float","left");a(h).prepend('<div id="dragwrapper'+c+'"><div id="drag'+c+'"><img alt="handle" src="http://4.bp.blogspot.com/-BSOVMuAgJgU/Umz0-AsGtyI/AAAAAAAAEdI/dXcdcClGu6w/s1600/handle.png" title="Drag to the left or right to see the Before/After" id="handle'+c+'" /></div></div>');a("#dragwrapper"+c).css({position:"absolute",padding:"0",left:(n/2)-(a("#handle"+c).width()/2)+"px","z-index":"20"}).width(a("#handle"+c).width()).height(p);a("#dragwrapper"+c).css({opacity:0.25});a("div:eq(2)",h).height(p).width(n/2).css({"background-image":"url("+m+")",position:"absolute",overflow:"hidden",left:"0px","z-index":"10"});a("div:eq(3)",h).height(p).width(n).css({"background-image":"url("+j+")",position:"absolute",overflow:"hidden",right:"0px"});a("#drag"+c).width(2).height(p).css({background:"#888",position:"absolute",left:"3px"});a("#beforeimage"+c).css({position:"absolute",top:"0px",left:"0px"});a("#afterimage"+c).css({position:"absolute",top:"0px",right:"0px"});a("#handle"+c).css({"z-index":"100",position:"relative",cursor:"pointer",top:(p/2)-(a("#handle"+c).height()/2)+"px",left:"-3px"});a(h).append('<img src="http://4.bp.blogspot.com/-nztJPbkautM/Umz1AFOuJZI/AAAAAAAAEdU/-_LYBKwoKDM/s1600/b_a-lt-small.png" id="lt-arrow'+c+'"><img src="http://4.bp.blogspot.com/-iWaLPmPPAU8/Umz0_PLDCtI/AAAAAAAAEdM/Zam6QWGabVM/s1600/b_a-rt-small.png" id="rt-arrow'+c+'">');if(e.showFullLinks){a(h).after('<div class="balinks" id="links'+c+'" ><span class="bflinks"><a id="showleft'+c+'" href="javascript:void(0)">Show only before</a></span><span class="bflinks"><a id="showright'+c+'" href="javascript:void(0)">Show only after</a></span></div>');a("#links"+c).width(n);a("#showleft"+c).css({position:"relative",left:"0px"}).click(function(){a("div:eq(2)",h).animate({width:n},200);a("#dragwrapper"+c).animate({left:n-a("#dragwrapper"+c).width()+"px"},200)});a("#showright"+c).css({position:"absolute",right:"0px"}).click(function(){a("div:eq(2)",h).animate({width:0},200);a("#dragwrapper"+c).animate({left:"0px"},200)})}var g=a("#dragwrapper"+c).offset();var k=g.left;var i=a("div:eq(2)",h).width();var f=a("div:eq(3)",h).width();a("#dragwrapper"+c).draggable({handle:a("#handle"+c),containment:h,axis:"x",drag:function(q,o){var s=a(this).offset();var r=s.left-k;a("div:eq(2)",h).width(i+r);a("#lt-arrow"+c).stop().animate({opacity:0},0);a("#rt-arrow"+c).stop().animate({opacity:0},0)}});if(e.animateIntro){a("div:eq(2)",h).width(n);a("#dragwrapper"+c).css("left",n-(a("#dragwrapper"+c).width()/2)+"px");setTimeout(function(){a("#dragwrapper"+c).css({opacity:1}).animate({left:(n/2)-(a("#dragwrapper"+c).width()/2)+"px"},e.introDuration,function(){a("#dragwrapper"+c).animate({opacity:0.25},1000)});a("div:eq(2)",h).width(n).animate({width:n/2+"px"},e.introDuration,function(){l()})},e.introDelay)}else{l()}function l(){a(h).hover(function(){a("#lt-arrow"+c).stop().css({"z-index":"20",position:"absolute",top:p/2-a("#lt-arrow"+c).height()/2+"px",left:parseInt(a("#dragwrapper"+c).css("left"))-10+"px"}).animate({opacity:1,left:parseInt(a("#lt-arrow"+c).css("left"))-6+"px"},200);a("#rt-arrow"+c).stop().css({position:"absolute",top:p/2-a("#lt-arrow"+c).height()/2+"px",left:parseInt(a("#dragwrapper"+c).css("left"))+10+"px"}).animate({opacity:1,left:parseInt(a("#rt-arrow"+c).css("left"))+6+"px"},200);a("#dragwrapper"+c).animate({opacity:1},200)},function(){a("#lt-arrow"+c).animate({opacity:0,left:parseInt(a("#lt-arrow"+c).css("left"))-6+"px"},350);a("#rt-arrow"+c).animate({opacity:0,left:parseInt(a("#rt-arrow"+c).css("left"))+6+"px"},350);a("#dragwrapper"+c).animate({opacity:0.25},350)});a(h).click(function(q){var r=q.pageX-this.offsetLeft;var o=n-r;a("#dragwrapper"+c).stop().animate({left:r-(a("#dragwrapper"+c).width()/2)+"px"},600);a("div:eq(2)",h).stop().animate({width:r+"px"},600);a("#lt-arrow"+c).stop().animate({opacity:0},50);a("#rt-arrow"+c).stop().animate({opacity:0},50)});a(h).one("mousemove",function(){a("#dragwrapper"+c).stop().animate({opacity:1},500)})}})}})})(jQuery);
//]]>
</script>
<script type='text/javascript'>
$(function(){
$('#beforeafter1').beforeAfter({showFullLinks : true});
});
</script>
Note: if the above script doesn't work for you, add it above the </body> tag. Also, please see if you have added jQuery in your template (if you did so, then remove the line in green)
Step 3. To add it as a gadget - go to "Layout" > click on the "Add a gadget" link > choose "HTML/Javascript" option in the pop-up window and paste this code inside the empty box:
<div id='beforeafter1'>Add the URL of the first image that is the "Before" image, and the URL of the second image that should be the "After" image. Also, don't forget to specify the width and height of each picture, so that they work on all browsers (see the part in orange and just add the height and width of your images).
<div><img alt='before' src='URL of the first image' /><div><img alt='after' src='URL of the second image' /></div>
If you want to add more images, you will need to change the ID of the container. In my example, the container is called beforeafter1, so you will need to change it to beforeafter2 and so on, although, you can choose any name as long as all are different.
Then, add another line, like the blue one from below, in the first code that you added in step 2:
<script type='text/javascript'>You can add as many before/after images as you want, as long ass all containers have a different ID and the corresponding lines are added in the script.
$(function(){
$('#beforeafter1').beforeAfter({showFullLinks : true});
$('#beforeafter2').beforeAfter({showFullLinks : true});
});
</script>
Below each image /photo container are the "Show only Before" and "Show only after" links that, once you click on them, will display the "before" or "after" picture. If you want to hide these links, then just change "true" to "false" in the first code (step 2) and they will not be displayed anymore.
Note: if you see white space around the drag icons, then search for this code in your template:
<Group description="Images" selector=".main-inner">And change the #ffffff value to transparent. That's it!
<Variable name="image.background.color" description="Background Color" type="color" default="#ffffff" value="#ffffff"/>
Autor: Catch my fame
- Orbit - Jquery Image Slider Plugin For Blogger
In this tutorial, you will see how to add another beautiful image slider for Blogger / BlogSpot made with jQuery and, of course, with HTML and CSS. This slider, called Orbit, is a lightweight jQuery plugin that will display multiple images in a limited...
- Spacegallery: Image Gallery/slideshow Made With Jquery
There are many types of galleries for images that can be found on the internet, but we rarely find one displaying images so differently like this one. Those using Mac OS X will surely notice a lot of similarity with Time Machine and those who don't,...
- How To Add Go To Top And Go To Bottom Buttons Using Jquery In Blogger
The Up and Down buttons can be used to navigate to the top and bottom of the page content, especially when on the main page are many articles or when an article has too many comments. These buttons have a fadeIn and fadeOut effect, this means that they...
- Add Static Facebook Pop Out Like Box With Smooth Jquery Hover Effect
In this tutorial, I will show you how to add a cool floating Facebook like widget for Blogger that slides to the left on mouseover. Demo: You can see a static Facebook badge on the right side of this blog: Demo blog Adding Static Facebook Like widget...
- Add Css/jquery Fixed Horizontal Menu To Blogger Blog
This navigation bar gets semi-transparent when you scroll down the page and is slightly showing up by fading out and becoming almost transparent. When the user hovers over it, the menu becomes opaque again. Inside of the navigation there are some links,...
