Blogger Tips
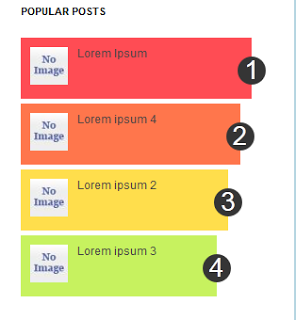
Popular Posts is a widget provided by Blogger that displays the most viewed posts on the blog in the last 7 days, last month and of all time. It has three displaying modes: display title only, display title with image thumbnail or display title along with the posts snippets.
To customize this popular posts widget, we have to add a new variable and some CSS codes to our blogger template. So let's begin:

How to add multi-colored popular posts to Blogger
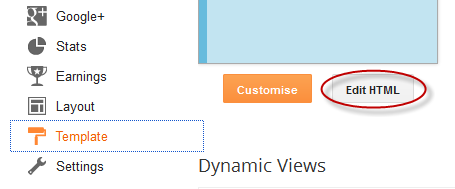
Step 1. Login to your Blogger Dashboard, go to Design >> Edit HTML

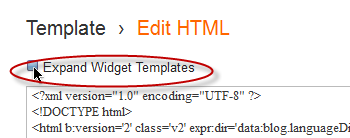
Step 2. Select "Expand Widget Templates" (make a backup first)

Step 3. Search for the following tag:
Note: If you can't find it, paste it below the autor information that is usually below this tag (CTRL + F):
...and should end up with this symbol:
Step 4. Copy and paste just below/after this tag, the next code:
Step 5. Search for the following piece of code:
Step 6. Just above/before it, add this code:
Step 7. Now find the following code:
Step 8. Delete it until you reach at this tag (delete the </b:widget> also):
Note: Be very careful when removing it. The entire fragment of code should look like this:
Step 9. After you have deleted the above code, paste the following in its place:
Step 10. Save template.
Settings
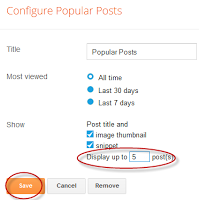
- Go back to Layout and click on the edit link of Popular Posts widget.
Select to "display up to 5 posts", then Save the widget.

- You can easily change the background color of the popular posts widget, going to Template >> Customize >> Advanced >> PopularPostsBackground and there you can select any color you want.

You're done!
If you are enjoying reading this blog, please like & subscribe for more tutorials.
For any questions or suggestions, leave a comment below.
- Add Author's Profile Picture And Name In Multi Author Blog
In this tutorial we will see how to add the author's profile picture and name on a Blogger blog just below the post title. This can make your blog not only look more personal but attaching an image to your blog posts in Blogger can help visitors identify,...
- New Blogger Widget: Contact Form - Change Style & Install In A Static Page
Just a few days ago, Blogger introduced a new widget. It is about a contact form that you can add to your blog easily. It is very basic, because - at least for now, does not permit incorporating files or send anything other than plain text. The contact...
- How To Remove Showing Posts With Label In Blogger
For any default Blogger layout, the "Showing posts with label" message shows up above the posts each time you click on a label link. As it's a pretty useless and annoying message, many people like to have it removed. If that is your wish, just...
- How To Remove Blogger Threaded Comments
The Blogger Threaded commenting system allows a reader to reply to other reader comments on that post. Blogger supports threaded commenting with two levels - the original comment, and the replies to that comment. If you want remove threaded comments from...
- Add Css/jquery Fixed Horizontal Menu To Blogger Blog
This navigation bar gets semi-transparent when you scroll down the page and is slightly showing up by fading out and becoming almost transparent. When the user hovers over it, the menu becomes opaque again. Inside of the navigation there are some links,...
Blogger Tips
Add Multi-Colored Popular Posts to Blogger
Popular Posts is a widget provided by Blogger that displays the most viewed posts on the blog in the last 7 days, last month and of all time. It has three displaying modes: display title only, display title with image thumbnail or display title along with the posts snippets.
To customize this popular posts widget, we have to add a new variable and some CSS codes to our blogger template. So let's begin:

How to add multi-colored popular posts to Blogger
Step 1. Login to your Blogger Dashboard, go to Design >> Edit HTML

Step 2. Select "Expand Widget Templates" (make a backup first)

Step 3. Search for the following tag:
/* Variable definitions
====================
Note: If you can't find it, paste it below the autor information that is usually below this tag (CTRL + F):
<b:skin><![CDATA[/*
...and should end up with this symbol:
----------------------------------------------- */
Step 4. Copy and paste just below/after this tag, the next code:
<Group description="PopularPosts Backgrounds" selector="#PopularPosts1">
<Variable name="PopularPosts.background.color1" description="background color1" type="color" default="#fa4242" value="#ff4c54"/>
<Variable name="PopularPosts.background.color2" description="background color2" type="color" default="#ee6107" value="#ff764c"/>
<Variable name="PopularPosts.background.color3" description="background color3" type="color" default="#f0f" value="#ffde4c"/>
<Variable name="PopularPosts.background.color4" description="background color4" type="color" default="#ff0" value="#c7f25f"/>
<Variable name="PopularPosts.background.color5" description="background color5" type="color" default="#0ff" value="#33c9f7"/>
</Group>
Step 5. Search for the following piece of code:
]]></b:skin>
Step 6. Just above/before it, add this code:
#PopularPosts1 ul{margin:0;padding:5px 0;list-style-type:none}
#PopularPosts1 ul li{position:relative;margin:5px 0;border:0;padding:10px}
#PopularPosts1 ul li:first-child{background:$(PopularPosts.background.color1);width:90%}
#PopularPosts1 ul li:first-child:after{content:"1"}
#PopularPosts1 ul li:first-child + li{background:$(PopularPosts.background.color2);width:85%}
#PopularPosts1 ul li:first-child + li:after{content:"2"}
#PopularPosts1 ul li:first-child + li + li{background:$(PopularPosts.background.color3);width:80%}
#PopularPosts1 ul li:first-child + li + li:after{content:"3"}
#PopularPosts1 ul li:first-child + li + li + li{background:$(PopularPosts.background.color4);width:75%}
#PopularPosts1 ul li:first-child + li + li + li:after{content:"4"}
#PopularPosts1 ul li:first-child + li + li + li + li{background:$(PopularPosts.background.color5);width:70%}
#PopularPosts1 ul li:first-child + li + li + li + li:after{content:"5"}
#PopularPosts1 ul li:first-child:after,#PopularPosts1 ul li:first-child + li:after,#PopularPosts1 ul li:first-child + li + li:after,#PopularPosts1 ul li:first-child + li + li + li:after,#PopularPosts1 ul li:first-child + li + li + li + li:after{position:absolute;top:20px;right:-15px;border-radius:50%;background:#353535;width:30px;height:30px;line-height:1em;text-align:center;font-size:28px;color:#fff}
#PopularPosts1 ul li .item-thumbnail{float:left;border:0;margin-right:10px;background:transparent;padding:0;width:40px;height:40px}
#PopularPosts1 ul li a{font-size:12px;color:#444;text-decoration:none}
#PopularPosts1 ul li a:hover{color:#222;text-decoration:none}
Step 7. Now find the following code:
<b:widget id='PopularPosts1' locked='false' title='Popular Posts' type='PopularPosts'>
Step 8. Delete it until you reach at this tag (delete the </b:widget> also):
</b:widget>
Note: Be very careful when removing it. The entire fragment of code should look like this:
<b:widget id='PopularPosts1' locked='false' title='Popular Posts' type='PopularPosts'>
<b:includable id='main'>
<b:if cond='data:title'><h2><data:title/></h2></b:if>
<div class='widget-content popular-posts'>
<ul>
<b:loop values='data:posts' var='post'>
<li>
<b:if cond='data:showThumbnails == "false"'>
<b:if cond='data:showSnippets == "false"'>
<!-- (1) No snippet/thumbnail -->
<a expr:href='data:post.href'><data:post.title/></a>
<b:else/>
<!-- (2) Show only snippets -->
<div class='item-title'><a expr:href='data:post.href'><data:post.title/></a></div>
<div class='item-snippet'><data:post.snippet/></div>
</b:if>
<b:else/>
<b:if cond='data:showSnippets == "false"'>
<!-- (3) Show only thumbnails -->
<div class='item-thumbnail-only'>
<b:if cond='data:post.thumbnail'>
<div class='item-thumbnail'>
<a expr:href='data:post.href' target='_blank'>
<img alt='' border='0' expr:expr:src='data:post.thumbnail' expr:/> </a>
</div>
</b:if>
<div class='item-title'><a expr:href='data:post.href'><data:post.title/></a></div>
</div>
<div both;'/>
<b:else/>
<!-- (4) Show snippets and thumbnails -->
<div class='item-content'>
<b:if cond='data:post.thumbnail'>
<div class='item-thumbnail'>
<a expr:href='data:post.href' target='_blank'>
<img alt='' border='0' expr:expr:src='data:post.thumbnail' expr:/> </a>
</div>
</b:if>
<div class='item-title'><a expr:href='data:post.href'><data:post.title/></a></div>
<div class='item-snippet'><data:post.snippet/></div>
</div>
<div both;'/>
</b:if>
</b:if>
</li>
</b:loop>
</ul>
<b:include name='quickedit'/>
</div>
</b:includable>
</b:widget>
Step 9. After you have deleted the above code, paste the following in its place:
<b:widget id='PopularPosts1' locked='false' title='Popular Posts' type='PopularPosts'>
<b:includable id='main'>
<b:if cond='data:title'>
<h2><data:title/></h2>
</b:if>
<div class='widget-content popular-posts'>
<ul>
<b:loop values='data:posts' var='post'>
<li>
<b:if cond='data:showThumbnails == "false"'>
<b:if cond='data:showSnippets == "false"'>
<a expr:href='data:post.href' expr:title='data:post.title' rel='bookmark'><data:post.title/></a>
<b:else/>
<a expr:href='data:post.href' expr:title='data:post.snippet' rel='bookmark'><data:post.title/></a>
</b:if>
<b:else/>
<b:if cond='data:showSnippets == "false"'>
<b:if cond='data:post.thumbnail'>
<img class='item-thumbnail' expr:alt='data:post.title' expr:src='data:post.thumbnail'/>
<b:else/>
<img alt='no image' class='item-thumbnail' src='http://2.bp.blogspot.com/-XQt2v4x5dl8/T1zdpFh392I/AAAAAAAABUU/xMJZDedw38k/s1600/default.jpg'/>
</b:if>
<a expr:href='data:post.href' expr:title='data:post.title' rel='bookmark'><data:post.title/></a>
<div class='clear'/>
<b:else/>
<b:if cond='data:post.thumbnail'>
<img class='item-thumbnail' expr:alt='data:post.title' expr:src='data:post.thumbnail'/>
<b:else/>
<img alt='no image' class='item-thumbnail' src='http://2.bp.blogspot.com/-XQt2v4x5dl8/T1zdpFh392I/AAAAAAAABUU/xMJZDedw38k/s1600/default.jpg'/>
</b:if>
<a expr:href='data:post.href' expr:title='data:post.snippet' rel='bookmark'><data:post.title/></a>
<div class='clear'/>
</b:if>
</b:if>
</li>
</b:loop>
</ul>
</div>
</b:includable>
</b:widget>
Step 10. Save template.
Settings
- Go back to Layout and click on the edit link of Popular Posts widget.
Select to "display up to 5 posts", then Save the widget.

- You can easily change the background color of the popular posts widget, going to Template >> Customize >> Advanced >> PopularPostsBackground and there you can select any color you want.

You're done!
If you are enjoying reading this blog, please like & subscribe for more tutorials.
For any questions or suggestions, leave a comment below.
- Add Author's Profile Picture And Name In Multi Author Blog
In this tutorial we will see how to add the author's profile picture and name on a Blogger blog just below the post title. This can make your blog not only look more personal but attaching an image to your blog posts in Blogger can help visitors identify,...
- New Blogger Widget: Contact Form - Change Style & Install In A Static Page
Just a few days ago, Blogger introduced a new widget. It is about a contact form that you can add to your blog easily. It is very basic, because - at least for now, does not permit incorporating files or send anything other than plain text. The contact...
- How To Remove Showing Posts With Label In Blogger
For any default Blogger layout, the "Showing posts with label" message shows up above the posts each time you click on a label link. As it's a pretty useless and annoying message, many people like to have it removed. If that is your wish, just...
- How To Remove Blogger Threaded Comments
The Blogger Threaded commenting system allows a reader to reply to other reader comments on that post. Blogger supports threaded commenting with two levels - the original comment, and the replies to that comment. If you want remove threaded comments from...
- Add Css/jquery Fixed Horizontal Menu To Blogger Blog
This navigation bar gets semi-transparent when you scroll down the page and is slightly showing up by fading out and becoming almost transparent. When the user hovers over it, the menu becomes opaque again. Inside of the navigation there are some links,...
